
How to Set Up LU Email
Lamar University provides email and calendar services to all faculty/staff.
Keep your email account secure. Lamar University personnel will never ask you for your password!

Getting Started
Set up Outlook Desktop Client-Windows (Mandatory)
Note: This is mandatory for Outlook Desktop Clients and only needs to be preformed once.
- From your workstation, select Start
- In the search box, type Mail press Enter
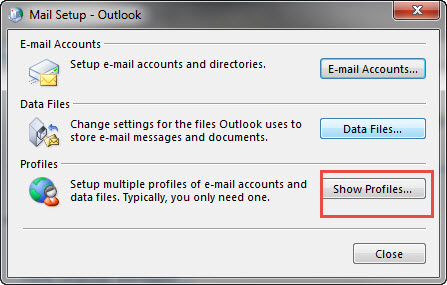
- In the Mail Setup – Outlook window, click Show Profiles
- In the Mail window, click Add.
- Type a profile name (ex: LU Office 365), then click OK
- Select Always use this profile, click on the downward arrow and select LU Office 365, then click OK.
Note: If you have multiple accounts, select Prompt for a profile to be used to allow you to select which account to login to. - In the Add Account window, type your LEA email address, lea@lamar.edu, then click Next.
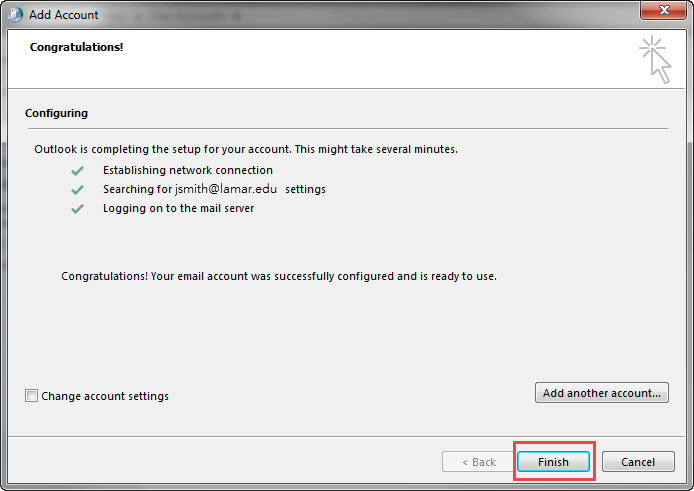
- Wait for configuration to complete, then click Finish. Your account should automatically configure without errors. If you receive errors please verify you entered the correct email address in the format of lea@lamar.edu and try again.
- Reboot your computer before opening Outlook.
Set up Mac Mail (Mandatory)
- From your workstation, select Apple > System Preferences
- In the search box, type Internet Accounts press Return
- Select Exchange
- Type your name, your LEA email address, lea@lamar.edu, password and click Sign in
- Make sure all are checked and select Done
Set up Outlook for Mac (Mandatory)
- Open Outlook
- Select Tools > Accounts
- Select Exchange or Office 365
- In the E-mail address box, type your LEA email address, lea@lamar.edu,
- Type your LEA email address, lea@lamar.edu and password.
- Click Add Account
- Select Always use my response for this server and click Allow.
Mobile Devices
Set Up for Android and IOS

Set up Outlook Desktop Client Email Folder(s)
If you would like to give someone permissions to access any email folder, there are three steps.
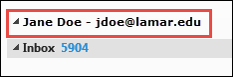
Step 1: You need to give the person permission to access your account name (e.g., Jane Doe)
Step 2: You need to give the person permission to access your primary folder (Inbox)
Step 3: You need to give the person permission to access each Folder/Subfolder you want to share
The process for sharing your Mailbox and your Individual folders is the same.
Step 1: Permission to access your account name (e.g., Jane Doe)
- Open Outlook
- Click Mail in the bottom-left corner of the window
- Right-click your account name
- Click Data File Properties
- Click the Permissions tab
- Click Add..and add the person(s) with whom you wish to share your folder and click OK
- Click the person(s) and select Folder visible under Other
- Click Apply and OK
Step 2: Permission to access your primary folder (e.g., Inbox)
- Right-click on Inbox
- Click the Permissions tab
- Click Add. Add the person(s) with whom you wish to share your folder and click OK
- Click the person(s) and select Folder visible under the Other section
- Click Apply and OK
- Send the person you just shared with an email notifying them they now have access
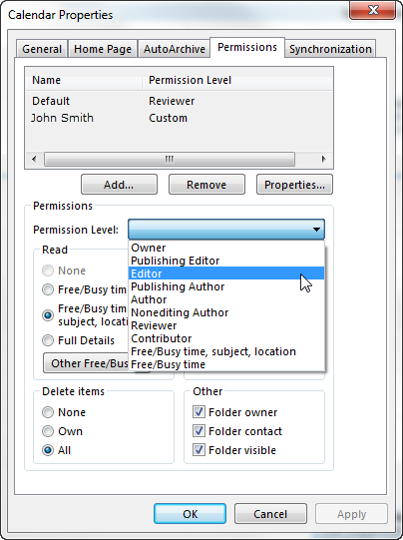
Step 3: Permissions to access each Secondary Folder/Subfolder you want to share
- Right-click desired secondary folder > Properties
- Click the Permissions tab
- Click Add. And add the person(s) with whom you wish to share your folder and click OK
- Click the Permissions Level drop-down and select one of the following:
- Reviewer - Read items and files only.
- Editor – Create, read, modify, and delete all items and files.
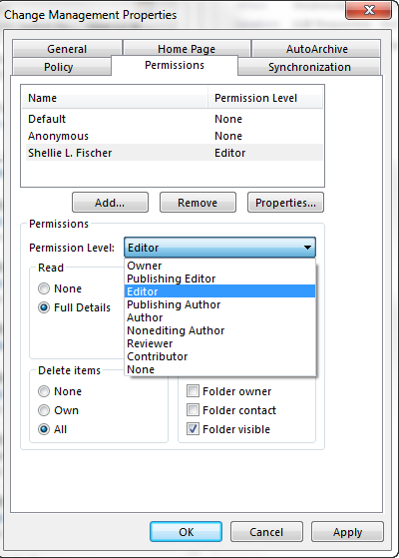
- Click Apply and OK
- Send the person you just shared with an email notifying them they now have access.
Adding Outlook Desktop Client Shared Email Folder(s)
- Open Outlook
- Click Mail in the bottom-left corner of the window
- Click File > Open & Export
- Click Other User’s Folder
- In the Name box, enter the name of the person who granted you sharing access, or click Name to select from the list.
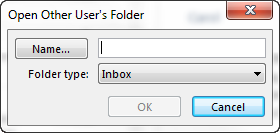
- In the Folder type list, click the folder you wish to open. For example, Inbox.
- Click OK
- The owner of the shared email folder will appear. Click the arrow to view the shared folder.
Set up Outlook Desktop Client Mail Rules
- Open Outlook
- In the Navigation Pane, click Mail.
- On the Tools menu, click Rules and Alerts.
- If you have more than one e-mail account, in the Apply changes to this folder list, select the Inbox that you want.
- Click New Rule.
- Select a template
- Under Step 1: Select a template, select the template that you want from the Stay Organized or Stay Up to Date collection of templates.
- Under Step 2: Edit the rule description, click an underlined value. For example, if you click the people or distribution list link, the Address Book opens.
- Which condition(s) do you want to check?
- Under Step 1: Select condition(s), select the conditions that you want the messages to meet for the rule to apply.
- Under Step 2: Edit the rule description, click an underlined value if you have not done so already, and then click Next.
- Select a template
-
- What do you want to do with the message?
- Under Step 1: Select action(s), select the action that you want the rule to take when the specified conditions are met.
- Under Step 2: Edit the rule description, click an underlined value if you have not done so already, and then click Next.
- Are there any exceptions?
- Under Step 1: Select exception(s), select any exceptions to the rule, and then click Next.
- Finish rule setup
- What do you want to do with the message?
-
-
- To finish creating the rule, enter a name for the rule, and then select any other options that you want.
-
If you want to run this rule on messages that already are in one of your folders, select the Run this rule now on messages already in "folder" check box.
-
To apply this rule to all your e-mail accounts and the Inbox associated with each account, select the Create this rule on all accounts check box.
- Click Finish
-
Set up Outlook Web App (OWA) Mail Rules
-
Inbox rules in OWA automatically perform specific actions on messages as they arrive, based on your criteria.
Examples
- For example, you can create a rule to automatically move all mail sent to you from a specific person.
- For example, you can create a rule to automatically move all mail sent to a group you're a member of to a specific folder.
Best practice is to create rules in OWA.
- Log in to your LU Email at https://outlook.com/lamar.edu
- Click Mail
- Click the gear icon, then Options
- On the Options screen, in the column on the left, under Mail, Select Inbox and Sweep Rules
- Click +, then select the desired option. (For example, Create a new rule)
- Enter a name for your rule
- Under When the message arrives, and, select the desired criteria.
- If your condition is based on a person from contacts, a people window will open, where you can find and select the desired person.
- If your condition is based on looking for specific words, a specify words or phrases dialog box will open. You must type the word or phrase, click the plus sign, then click Ok.
You'll see the value(s) you specified to the right of the condition you specified.
- Under Do All the following, select the action you want the rule to take. A window or dialog box will open where you can select the folder, category, or person associated with the action you selected.
- Click Save
Calendars
Set up Shared Outlook Desktop Client Calendars
Sharing Your Primary Calendar-Reviewer
Reviewer Can Read Items and Files Only
- Open Outlook
- Right-click your primary calendar under My Calendars.
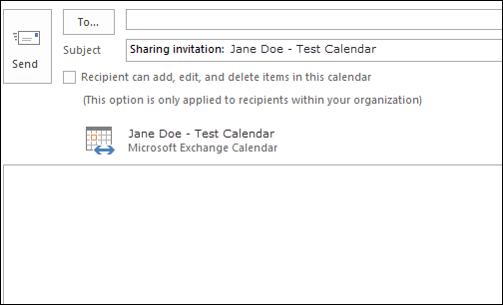
- Click Share > Share Calendar
- Click To and select the desired names
- Click the Details drop-down list and select from the following:
- Availability Only – Provides assignee with free/busy information
- Limited Details – Provides assignee with subject, location, day, and time
- Full Details – Provides assignee full event details including: subject, location, attendees, and description
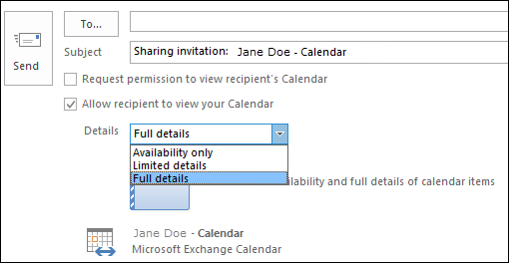
- Click Send
Sharing Your Primary Calendar-Editor
Editor Can Create, Read, Modify, and Delete All Items and Files
Step 1: Share as Reviewer with the following steps:
- Open Outlook
- Right-click your primary calendar under My Calendars.
- Click Share > Share Calendar
- Click To and select the desired names
- Click the Details drop-down list and select from the following:
- Availability Only – Provides assignee with free/busy information
- Limited Details – Provides assignee with subject, location, day, and time
- Full Details – Provides assignee full event details including: subject, location, attendees, and description
- Click Send
Step 2:
- Open Outlook
- Right-click your primary calendar under My Calendars.
- Click Share > Share Calendar
- Click To and select the desired names
- Click the Details drop-down list and select Full Details
- Click Send
- Right-click your primary calendar
- Select Properties > Permissions
- Select the name of the person you want to assign editor permissions.
- Select the Permissions Level drop-down and click Editor.
- Select Apply > OK
Sharing your Secondary Calendar-Reviewer
Reviewer Can Read Items and Files Only
- Open Outlook
- Click Mail in the bottom-left corner of the window
- Select the designated calendar
- Click Share > Share Calendar
- Click To and select the desired names
- Click Send
Adding A Shared Calendar
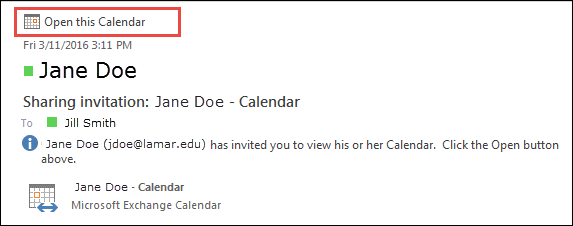
Based on permissions assigned, the calendar will open and will now appear in your My Calendars list or your Shared Calendars list.
Sharing Your Primary Calendar-Reviewer in Outlook Web App
- Choose the App launcher
 , and then choose Calendar.
 - Choose Share.
- Type the name of the person that you want to share your calendar with.
- Select Full details
- Click Send
Sharing Your Primary Calendar-Editor in Outlook Web App
Editor Can Create, Read, Modify, and Delete All Items and Files
- Choose the App launcher , and then choose Calendar.
- Choose Share
- Type the name of the person that you want to share your calendar with.
- Select Editor for permissions
- Click Send